Accessories:
Introduction
This portable solar panel comes with a pre-installed charge controller. This charge controller protects battery against unsafe electrical conditions and must be used to charge 12V batteries. To charge solar generators with a built-in charge controller, simply use the MC4 cables provided and plug them into the cables that came with your power station to charge. A 12V battery and solar generator can be charged at the same time.
Features
- Max 100 watts solar panel
- 20A PWM Waterproof charge controller
- Portable
- Waterproof IP65 for charge controller and IP65 for whole kit
- Removable MC4 Connectors
- Charge 12V battery by Lithium-ion,LifePO4,LTO, Flooded, GEL, AGM, Crystal and Calium batteries
- Charge 12V solar generator by MC4 Connectors- battery with inverter, power bank/station with built-in charge controller. ACOPOWER 400Wh solar generator recommended.Adapter is needed.
- Can be used on its own or as part of a larger solar system.
- Extendable with MC4 Connectors(Max.200W Solar Panel;needs adapter cables)
User’s guide
After receiving the solar panel kit, please check if all accessories are included in the package and prepare to test your kit:
1. Locate a sunlit area clear from hanging branches or obstacles.
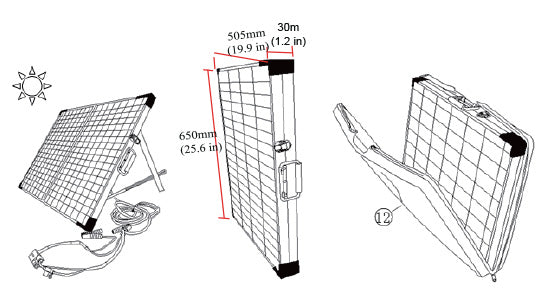
2. Unclip the two latches (2, Table 1) on the side of the unit and fold two panels outward. Extend the two support legs (4, Table 1) to desired length and lock the stands in position. Set solar panel kit in the position facing the sun.
Tip: To obtain the maximum output power of solar modules, it is recommended to adjust the solar modules based on solar trajectory.
How to test the solar panel
Set your multi-meter to measure DC voltage and put the red probe on the red positive MC4 cable (14a, Table 1) and the black probe on the black MC4 cable (14b, Table 1) and make sure the connections are secure. the
open-circuit voltage should be displayed on your multi-meter and it should be around 17.6V-23V. This is your solar panel’s voltage without going through the charge controller.
If you’re not getting something within that range or close to those numbers, you should check and make sure the solar panel is in direct sunlight and that the connections between the MC4 cables and the multi-meter is secure.
Method 2: Use your solar generator

To test if the solar panel is working with a solar generator with a built-in charge controller, connect the MC4 adapters that came with your solar generator and plug it in to the MC4 cables of the solar panel directly (14a and 14b, Table 1). Turn your solar generator on and it should start charging from the solar panel.
How to test if the charge controller is working
When testing the charge controller, please make sure a battery in working condition is used. The charge controller will not power on with a bad battery. A good thing to do is to test with your 12 V car battery.
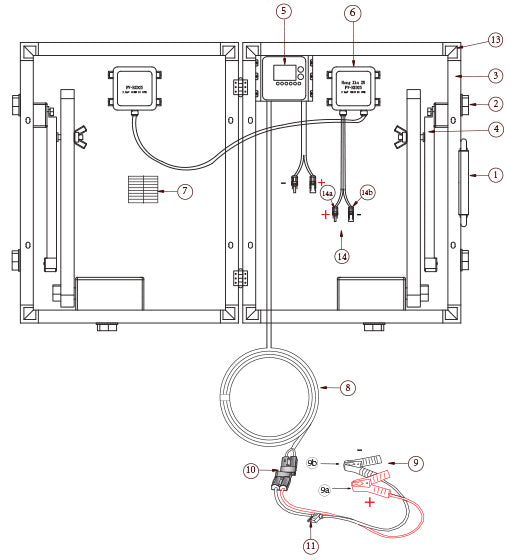
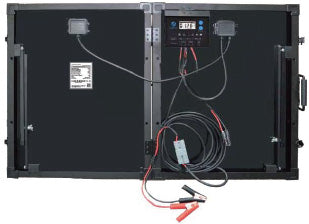
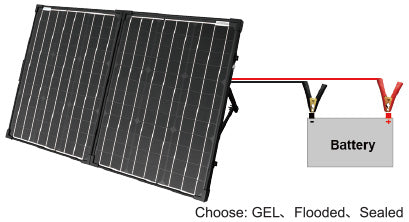
Step 1: Clamp the red positive battery clip (9a, Table1) to the positive terminal of 12V battery, black negative battery clip (9b, Table 1) to the negative terminal and make sure the connection is secure.
Step 2: When all the connections are complete, the Battery status indicator (5, Figure 1) should light up if the battery is connected to the charge controller. If the solar panel is under direct sunlight, the charging status indicator (5, Figure 1) will be on as well. (Detailed information under Specifications section)
Tip: The charge controller will not respond unless it is connected to a battery! Always connect the battery first, then load (if applicable).
For lights explanation, please check the Specifications section.
What are you going to use it for
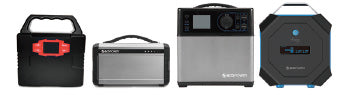
1. Charge solar generators
1.1. Charge 12V Solar Generator with built-in Charge Controller
Step 1: understand your solar generator and prepare the MC4 adapter for your solar generator
Step 2: Disconnect MC4 Connectors and let it to be a solar panel with MC4 connectors
Step 3: Use your MC4 Adapter to charge your solar generator
2. Charge your 12 Volt battery
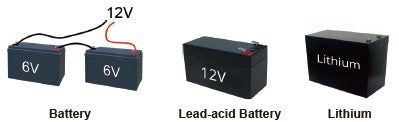
The solar panel kit is designed to charge a large range of batteries including Sealed, Flooded, GEL, AGM, Lithium, lead-acid battery and other deep cycle battery. The batteries are used as car battery, RV battery, boat battery and emergency back-up battery.
Step 1: understand your battery: battery type, capacity and voltage
Step 2: check the charge controller’s set up. We have defaulted the setting of the charge controller is for SEALED.
(AGM is also included in SEALED type.) If your battery’s type is different, please set your battery type with the charge controller following the instructions below.
3. Connect in parallel with another solar panel to charge a 12V battery faster
When you combine two solar panels in parallel, the current from the two solar panels are added together and this will enable the battery to charge faster. For more information about adapters needed, please contact us.
Warning: Make sure the combined current is lower than the rated current of the charge controller which is 20 amps for this model.
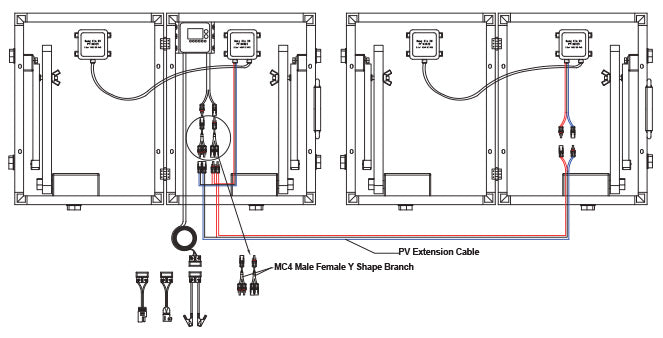
3.1 Parallel 12V Battery Charging: First connect the positive and negative electrodes MC4 of the two 100W PV modules to the MC4 Male Female Y Shape Branch input section (the two MC4 ports are the input parts) to form a solar panel parallel system (if the two solar panel are far, please purchase PV Extension Cable), then connect the positive and negative MC4 of the controller to the MC4 Male Female Y Shape Branch output section (MC4 Male Female Y Shape Branch is not included please purchase that if you need it). Please see the connection diagram:
4. Charge Your 24V battery
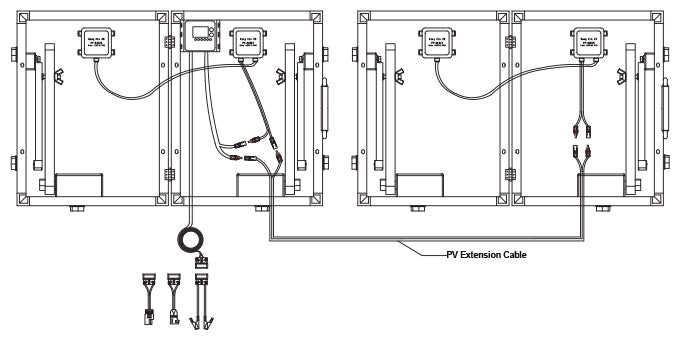
① Series 24V battery charging: first connect two 100W PV modules in positive and negative connection to form a series system (if the two solar panel are far, please purchase PV Extension Cable) Then connect the positive and negative terminals MC4 of the controller to the positive and negative terminals MC4 Please see the connection diagram:
5. RV /Camper battery charging
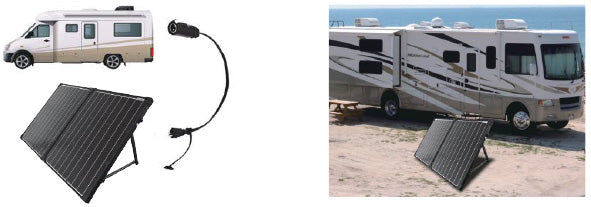
A: If your RV /Camper has a built-in solar controller, please refer to Figure 1;
B: If your RV /Camper has no built-in solar controller, please refer to Figure 2;
Note that please charge the battery, please select the appropriate battery type.
Figure 1:
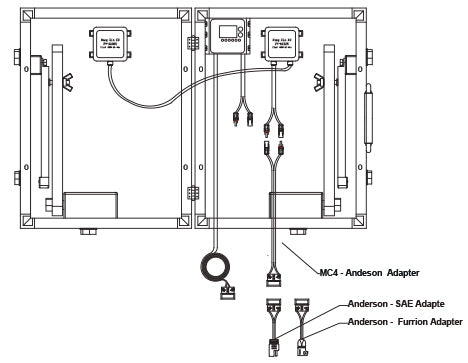
Figure 2:
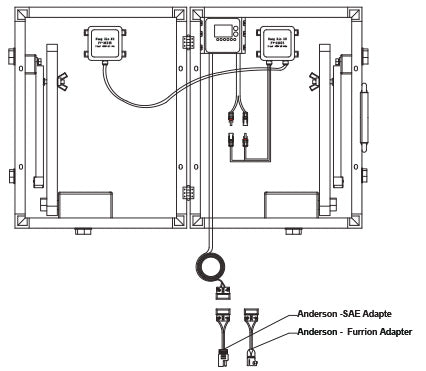
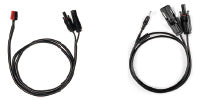
Please choose the right connector adapter (Purchase separately)
Specifications
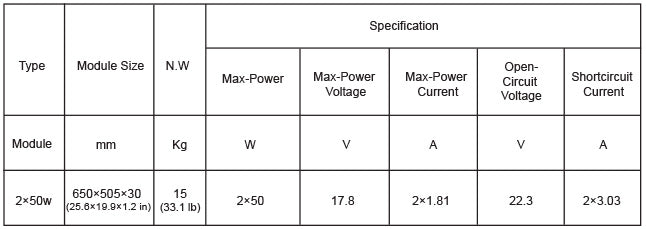
100w solar panel
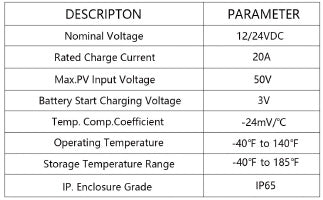
ProteusX 20A Charge Controller
The ProteusX is ACOPOWER's first waterproof PWM charge controller.
- It is a negative ground controller. This ensure compatibility with any negative ground system, which is the standard and most conventional way of grounding.
- There are 8 Battery Type Compatible -Lithium-ion, LiFePO4, LTO, Gel, AGM, Flooded, Crystal and Calcium.
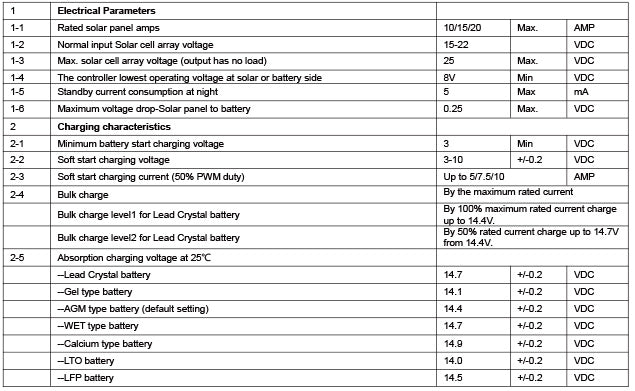
- It is 20 amps 12V/ 24v auto continuous charging capacity, enables use of up to 12V/360watts, 24V/720watts.
1. Features and Mounting
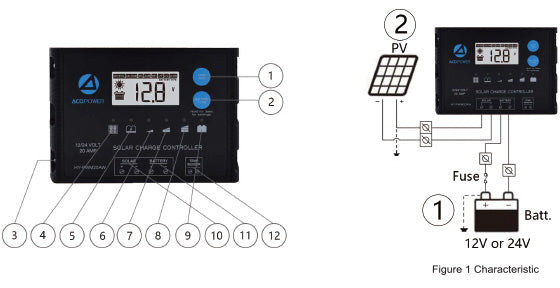
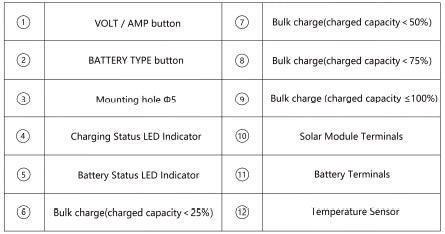
2. Indicators Description and Operation
2.1 OPERATION - LCD DISPLAY
Please check your battery manufacturer’s specifications to select correct battery type. The unit provides eight ( 8 ) battery types for selections: Lead crystal, Lithium-ion, LiFePO4, LTO, Gel, AGM, WET (conventional lead acid), and Calcium battery.
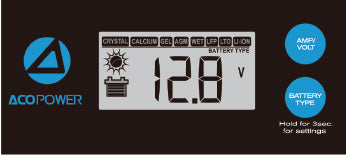
Press BATTERY TYPE button and hold for 3 seconds to go into your battery type selection mode, the battery type you select will be shown on the LCD meter, the default setting is AGM Battery; the controller will automatically me morize your battery type setting.
Li-ion battery shown in LCD indicates 3-SERIES Li-ion battery shown as below:
-- Lithium Cobalt Oxide LiCoO2 (LCO) battery
-- Lithium Manganese Oxide LiMn2O4 (LMQ) battery
-- Lithium Nickel Manganese Cobalt Oxide LiNiMnCoO2 (NMC) battery
-- Lithium Nickel Cobalt Aluminum Oxide LiNiCoAlo2 (NCA) battery
Remarks: This solar controller is recommended to just work with 3 x series above Li-ion batteries.
LiFePO4 battery shown in LCD indicates Lithium Iron Phosphate battery, LFP battery. LTO battery shown in LCD indicates Lithium titianate oxidized, Li4Ti5O12 battery.
Caution: Incorrect battery type setting may damage your battery.
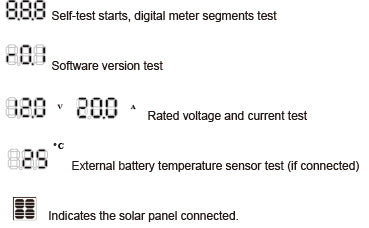
When the controller powers on, the unit will run self-qualify mode and automatically show below items on LCD before going into charging process
After going into charging process, the LCD displays the charging statues as below: Press VOLT / AMP button in sequence, the LCD will display in turn with Battery Voltage, Charging Current, Charged capacity (Amp-hour) and Battery Temperature (if external temperature sensor connected) Display in sequence

Alternatively Display voltage and FUL when battery is fully charged

The VOLT / AMP button can be changed at any time during charging process.
The LCD also can be treated as an independent voltage meter or thermometer.
2.2 CHARGING STAGE
The unit has a 6-stage charging algorithm.
*Diagnose - Soft Charge – Bulk Charge - Absorption charge – Equalizing Charge* - Float Mode**
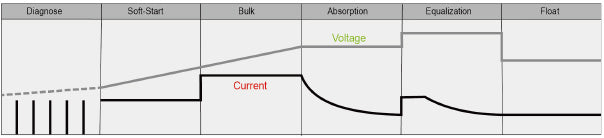
**Diagnose *** – Only for Lithium battery type, subjected to the Lithium battery initial voltage then determinegoing to Soft start or Bulk charge; if the Lithium battery is protected by BMS, the controller will automatically send the sign al periodically to the battery terminal to activate the BMS against protection.
Soft start - When batteries suffer an over-discharge, the controller will softly ramp the battery voltage upto 10V for 12V battery, 20V for 24V battery.
Bulk Charge - Maximum current charging until batteries rise to Absorption level. For Lead crystal battery type, the charge controller will deliver two step level of Bulk charge, when the first level rises the battery voltage up to14.4V, then switch into the second level of the 50% of the first bulk charge rate, until the Lead crystal battery voltage up to 14.7V.
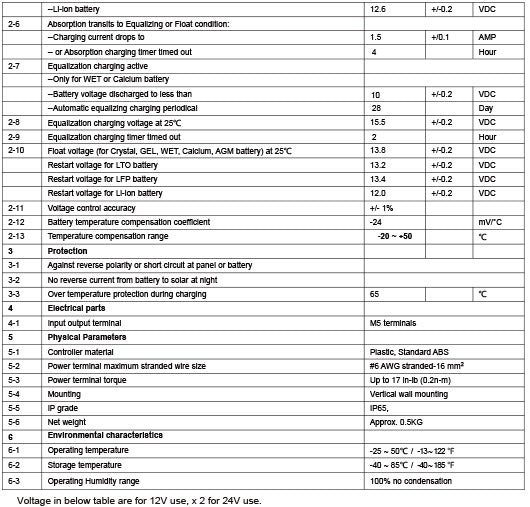
Absorption - Constant voltage charging and battery is over 85% for lead acid battery; a Li-ion battery, LiFePO4 battery and LTO battery will close fully charging after absorption stage, the absorption voltage level will reach 12.6V for Li-ion battery, 14.4V for LiFePO4 battery; 14.0V for LTO battery. 14.7V for Lead crystal battery.
**Equalization *** - Only for WET battery or Calcium battery type, when the battery is deeply drained below 10V or every 28 days cycle, it will automatically run this stage to bring the internal cells as an equal state and fully comp lement the loss of capacity. (Lead crystal, Li-ion, LiFePO4, LTO, Gel and AGM battery do not run Equalization ch arge)
Float Charge or Re-Bulk charge - Battery is fully charged and maintained at a safe level.A fully charged Lead acid battery (Crystal, GEL, AGM, WET battery) has a voltage of more than 13.8 Volts;if the lead acid battery volta ge drops to 12.8V at float mode, it will return to Bulk charge; Li-ion,LiFePO4 and LTO battery have no float mode; If a Li-ion battery voltage drops to 12.0V after absorption stage, it willreturn to Bulk charge; if a LIFePO4 battery voltage drops to 13.4V, or LTO battery voltage drops to 13.2V after Absorption stage, they will return to Bulk charge. (voltage x 2 for 24V use)
2.3 LED INDICATION
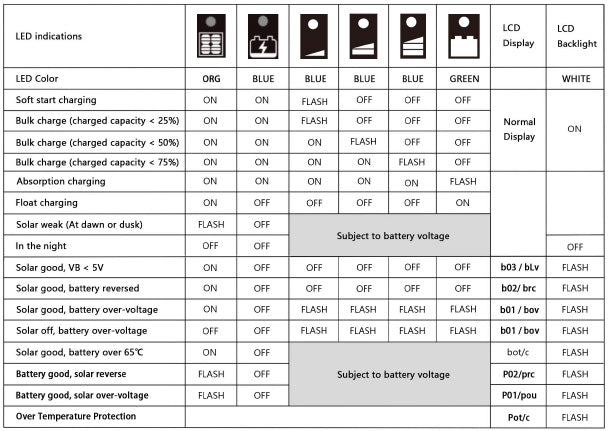
3 SAFETY PROTECTION
-Spark-free protection. -Reverse polarity solar and battery connection.
-Against reverse current from battery to solar panel at night.
-Over temperature protection with charging current de-rate.
-Transient overvoltage protection, a varistor or transient voltage suppressor (TVS) at the solar input and battery output against surge voltage.
-Safety and EMC compliance
IEC/EN 60335, EN61000-4-2, EN61000-4-3, EN61000-4-4, EN61000-4-5 FCC Class-B EN61000-4-6, EN61000-4-11, EN61000-3-3, CISPR14-1
4 MAINTENANCE
Occasionally, clean the case using a damp cloth and mild cleaning agent. Check with terminals without loose, rus ty; If connecting cable is damaged, replace the cable by qualified person.
5 SPECIFICATION
Voltage in below table are for 12V use, x 2 for 24V use.
6 Technical Specifications
FREQUENTLY ASKED QUESTIONS(FAQ)
ACOPOWER is always open to customers with technical support, if you have any issues, please feel free to contact ACOPOWER by email at support@acopower.com
Here we collected some frequently asked questions for reference:
Q. What type of batteries can be used with the kit?
A: There are 8 batteries can be used with it: Lithium-ion, LiFePO4, LTO, Gel, AGM, Flooded, Crystal and Calcium batteries.
Q: How to clean the solar panel surface?
A: When dust and dirt cover the surface of solar module, it can be cleaned with a soft brush, then use a damp cloth to wipe the surface to remove the remaining dust and dirt. Anything that covers the solar cells should be removed as soon as possible so as not to affect performance.
Q: Are the foldable solar modules are waterproof?
A: Yes, it is IP65 Waterproof for the kit and IP65 for Charge Controller;
Q: How can l get my battery's information?
A: To get your battery's information, please contact your battery's manufacturer or check your battery label.Q: How can I get my battery's information?
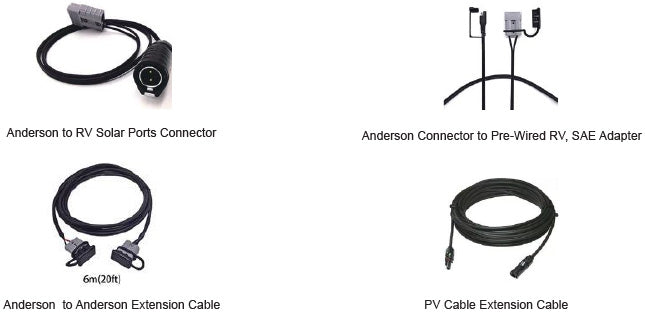
Q: Can I use an extension cables in the system?
A: Yes, an extension cable can be insert between Anderson Connectors
Q: How do I get the MC4 Adapter for my solar generator?
A: Please contact your solar generator's seller or manufacturer to get a MC4 adapter. The MC s a solar industrial universal connector. If your solar generator's supplier does not provide it, please contact ACOPOWER to get it customized.
Q: It worked for my car battery and it does not charge my solar generator. What is the problem?
A: Please check your solar generator's connection and voltage. Some generators in the marke are designed to be unique like 24V battery. Most solar generators in the market are 12V. Please contact your solar generator's supplier for the voltage confirmation
Q: My battery is two 6V batteries in series, can I use this kit?
A: Yes, two in series is considered a 12 Volts battery
Q: My battery is AGM, which battery setting shall l use?
A: No settings needed
Q: Will the system discharge my battery after sunset?
A: No, the controller avoids discharging from battery.
Q: Can I use my own controller, or can I use MPPT charge controller?
A: Yes, the charge controller is not permanently installed in the back, it is mounted on one panel.
Q:1 connect the kit with my battery with red clamp to Positive and black clamp to Negative.
Why the lights of charge controlleriare not on?
A: we suggest charging your car battery for the kit's test. And then test your solar panel's open circuit voltage and battery's voltage. If the solar panel open circuit voltage is good and the battery's voltage is lower than rechargeable voltage, the battery should be recharged some other way or replaced before charging with the solar panel.
Q: Can I use the solar panel to jumpstart a drained battery?
A: No, the drain car battery has lower voltage than what the kit could recharge. Therefore, lease jump start the battery and make sure the voltage of battery is high enough, then charge it by the solar pane
Q: Can I use the solar panel to avoid my battery drain?
A: Yes
D: My RV has a Zamp solar plug or other types of plugs, how do l use this solar panel kit?
A: You will need to refer to the RV user manual and find out what kind of adapter you may need.
Most adapters are sold on Amazon. Please contact support@acopower.com if you can't find what you need.
D: What if l want to permanently install the battery's terminal?
A: Please contact ACOPOWER for accessories from Anderson Connector to Ring Terminal on your battery.
Q: The solar panel kit has the correct voltage reading but it won't charge my generator
A: Please check the voltage rating of your generator, it might be rated at 24V and this solar panel kit is only for charging 12V batteries. Another possibility is that the generator is already fully charged
Safety Tips
- Before using the product, read all safety precautions.
- If the product is abnormal or damaged, do not use.
- Do not allow water to enter the controller
- Prevent sharp objects from impacting the surface of solar modules .
- Ensure proper battery clip connection to prevent short circuits.
- No user license serviceable parts inside.
- Do not disassemble or attempt to repair it.
Warranty
Limited Product Warranty-One Years Repair,Replacement and refund Remedy, but fuse excluded
The solar panel itself comes with an 18-months workmanship warranty and a 25-year 85% output warranty. Within 30 days of purchase: Items can be returned for a full refund or replacement, we will cover return shipping due to quality issues, buyer pays return shipping and replacement shipping due to non-quality issues. Within 30 days to 6 months: Items can be replaced new or refurbished due to quality issues, we will cover return shipping. Items can be replaced with a restocking fee due to non-quality issues, buyer pays for all shipping. Within 6 months to 18 months: Items can be replaced refurbished due to quality issues, buyer pays for all shipping.
Accessories:
Within 30 days of purchase: Items can be returned for a full refund or replacement, we will cover return shipping due to quality issues, buyer pays return shipping and replacement shipping due to non-quality issues. Within 30 days to 6 months: Items can be replaced new or refurbished due to quality issues, we will cover return shipping. Items can be replaced with a restocking fee due to non-quality issues, buyer pays for all shipping. Within 6 months to 18 months: Items can be replaced refurbished due to quality issues, buyer pays for all shipping.
Charge Controller:
The controller itself comes with a 1-year warranty.
Within 30 days of purchase: Items can be returned for a full refund or replacement, we will cover return shipping due to quality issues, buyer pays return shipping and replacement shipping due to non-quality issues. Within 30 days to 6 months: Items can be replaced new or refurbished due to quality issues, we will cover return shipping. Items can be replaced with a restocking fee due to non-quality issues, buyer pays for all shipping. Within 6 months to 1 year: Items can be replaced refurbished due to quality issues, buyer pays for all shipping.
Seller shall not be responsible or liable in any way to the customer or any third-party arising from any non -performance or delay in performance of any terms and conditions of sale, including this “Limited Warranty for PV Modules”, due to acts of God, war, riots, strikes, warlike conditions, plague or other epidemics, fire, flood, or any other similar cause or circumstance beyond reasonable control. such cases, this Limited Warranty shall be suspended without liability for the period of delay reasonably attributable to such causes.
Register your warranty with ACOPWER, please visit:
https://www.acopower.com/apps/product-registration